
Contents
If you notice ceiling water damage from an upstairs bathroom leak, you’re likely dealing with more than a surface stain. Ceiling Water Damage From Upstairs Bathroom Leak can result from a failing drain, cracked shower pan, or loose grout, allowing water to travel through framing, insulation, and drywall before you see any damage below. The real issue is often hidden, and the signs can worsen quickly. Knowing where the moisture moves next can change how you respond.
Key Takeaways
- Upstairs bathroom leaks often come from failed supply lines, cracked drains, loose toilet seals, or damaged shower waterproofing.
- Water can travel through grout, pipe openings, subflooring, and wall cavities before showing up as ceiling stains or sagging.
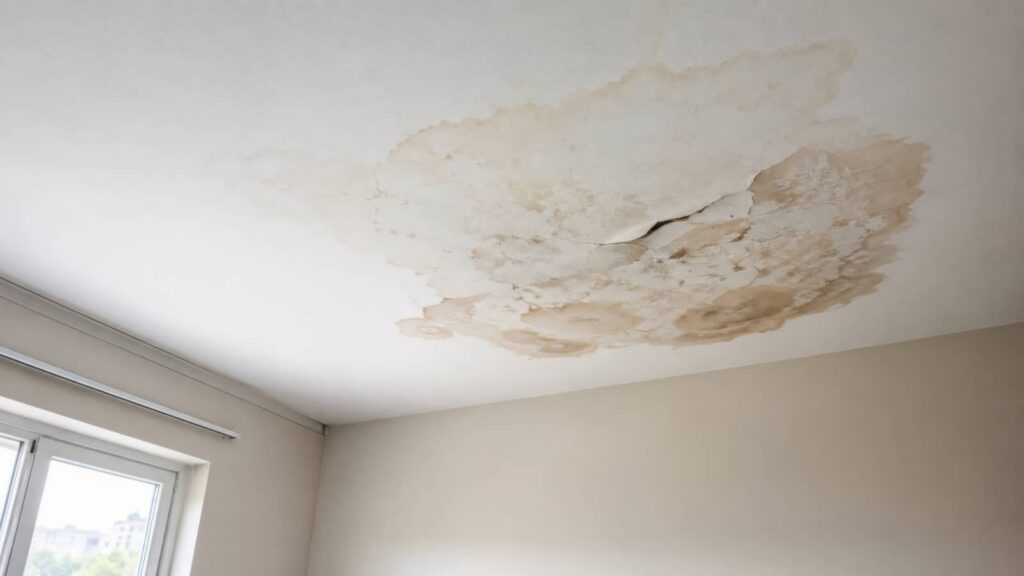
- Common warning signs include discoloration, bubbling paint, musty odors, and yellow or brown stains on the ceiling.
- Stop the leak quickly, protect the area, and document the damage with photos for repairs or insurance claims.
- Dry the area fast, remove damaged insulation if needed, and call a professional if the ceiling sags, stains spread, or mold appears.
What Causes Bathroom Ceiling Water Damage
Bathroom ceiling water damage usually starts with a leak from the upstairs bathroom that lets moisture seep through the floor assembly and into the ceiling below.
You may see ceiling water damage from an upstairs bathroom leak when a failed supply line, cracked drain, loose toilet seal, or deteriorated grout releases water during daily use.
If you own the space, inspect fixtures, caulk joints, and plumbing connections for active dripping, corrosion, or staining.
Faulty shower pans and overflowing tubs also create recurring moisture loads that saturate drywall and framing.
You should treat discoloration, sagging paint, or musty odor as warning signs, because they often indicate hidden damage.
Promptly stop the water source, then document the affected area and contact qualified restoration professionals.
How an Upstairs Bathroom Leak Spreads
When you have an upstairs bathroom leak, water often follows the fastest leak pathways through grout joints, pipe penetrations, or damaged waterproofing.
You’ll then see moisture migrate into subflooring, framing, and ceiling materials as gravity and capillary action spread it beyond the visible source.
This movement can mask the true origin of the damage, so you need a targeted inspection to trace the full extent.
Leak Pathways
An upstairs bathroom leak rarely stays localized, because water follows the path of least resistance through flooring seams, subfloor gaps, pipe penetrations, and wall cavities before it reaches the ceiling below.
You’ll usually see that spread start around the tub, shower, toilet, or vanity connection, then travel along framing members and into adjacent rooms. Your goal is to trace the entry point, not just the drip line, because the visible stain often lags behind the source.
- Flooring seams open direct channels
- Pipe penetrations bypass finished surfaces
- Wall cavities guide concealed movement
- Ceiling joints collect discharged water
When you understand these pathways, you can document damage accurately, protect the surrounding area, and work with confidence as part of a team handling the repair.
Moisture Migration
As moisture escapes from an upstairs bathroom leak, it doesn’t just drop straight to the ceiling below; it moves laterally through porous materials, framing voids, and hidden openings until gravity and saturation force it to collect at a weaker point.
You’ll often see spread across drywall seams, insulation, joists, and vapor barriers before staining appears. Capillary action pulls water into paper-faced gypsum, while air currents can push humidity into adjacent cavities.
In your home, temperature differences may also condense vapor on cooler surfaces, widening the wet area. That’s why the visible stain rarely matches the true extent of damage.
Restoration teams map moisture with meters and thermal imaging, then dry the cavity to stop microbial growth and preserve the structure.
Signs of Hidden Ceiling Water Damage
You can often spot hidden ceiling water damage through discoloration and staining that spread beyond the leak source.
Bubbling or peeling paint and texture usually mean moisture has weakened the ceiling finish, while musty odors can indicate mold growth in concealed areas.
If you notice these signs, you should inspect the ceiling promptly to limit further structural damage.
Discoloration And Staining
Discoloration on a ceiling often signals hidden water intrusion, especially when an upstairs bathroom leak has allowed moisture to spread behind the drywall or plaster.
You may notice yellow, brown, or rust-toned stains that map the leak path and widen as saturation continues. These marks usually appear around fixtures, seams, or fastener points, where water collects and mineral content concentrates.
You’re not alone in missing the early signs; subtle shading can be easy to overlook in normal lighting.
- Yellow halos around the wet area
- Brown or amber rings with defined edges
- Diffuse gray patches from prolonged moisture
- Dark spots near plumbing penetrations
When you see these changes, document them and contact a restoration professional promptly to protect your home and your peace of mind.
Bubbling Or Peeling
Bubbling paint or peeling drywall often means moisture has separated the ceiling finish from the substrate, usually after an upstairs bathroom leak has worked its way into the assembly.
You may notice raised blisters, loose paper facing, or edges that curl when you press lightly. These changes tell you the gypsum board has absorbed water and lost bond strength.
Inspect the affected area for soft spots, sagging, or cracks that extend beyond the visible bubble. Don’t ignore small failures; they often mark a wider hidden spread.
If you catch the problem early, you can limit demolition and protect surrounding finishes. A restoration professional can trace the leak source, measure material moisture, and confirm whether replacement or targeted drying will bring your ceiling back to a sound, stable condition.
Musty Odors And Mold
When moisture remains trapped above the ceiling, it often shows up as a persistent musty odor before visible mold appears. You may notice the smell intensifies after showers, which tells you hidden moisture is still active.
Mold spores thrive on damp drywall, insulation, and wood framing, so you need to treat the odor as a warning sign, not a nuisance.
- Check for discoloration near vents and seams.
- Test adjacent rooms for humidity spikes.
- Inspect attic access for damp insulation.
- Call a restoration specialist if the smell lingers.
If you act early, you help protect your home and keep your household in the group of owners who catch damage before it spreads.
The right drying and remediation steps can stop mold growth and restore safe conditions.
Stop the Leak and Protect the Room
First, shut off the water source to stop the leak from the upstairs bathroom and limit further ceiling saturation.
Then, isolate the affected room by moving furniture, electronics, and valuables away from the drip path, so you protect what matters and keep the space safe for everyone there.
Place a bucket or pan under active leakage, and use towels to catch runoff at trim lines and light fixtures.
If water is near wiring, switch off power to that circuit at the panel and avoid fixtures until a qualified pro clears them.
Document visible damage with photos for your records and insurance claim.
Next, inspect adjacent walls and the floor below for seepage, so you can tell whether the leak spread beyond the ceiling and plan the right repair response.
Dry Ceiling Water Damage Fast
Once you’ve stopped the leak, dry the ceiling as quickly as possible to limit swelling, staining, and mold growth. You can support recovery by increasing airflow, reducing humidity, and monitoring surface temperature.
Use fans to move air across the affected area, and run a dehumidifier nearby to pull moisture from the room. If you have a moisture meter, check readings daily so you know drying is progressing.
- Position oscillating fans toward the ceiling
- Keep windows closed if outdoor air is humid
- Run a dehumidifier continuously
- Log moisture readings each day
You’re doing the right thing by acting early; fast drying helps preserve the ceiling assembly and keeps the space safer for everyone in your home.
Remove Damaged Drywall and Insulation
If the drywall is swollen, sagging, or softened, you’ll need to remove it and any wet insulation so the cavity can dry completely.
Cut back to sound material, using a utility knife or drywall saw, and expose the framing only where damage exists.
Wear gloves, eye protection, and a respirator if dust is present.
Pull out saturated fiberglass or cellulose insulation and bag it immediately to prevent spreading debris.
Check the framing, fasteners, and backing for staining or deterioration, then leave the open cavity accessible for airflow and inspection.
You’re doing the right thing by creating a clean, stable repair area; that step helps your crew restore the ceiling with confidence and keeps the structure ready for the next phase.
Fix Stains, Mold, and Musty Odors
After the cavity dries, address any remaining stains, microbial growth, and odor sources before you close the ceiling. You’ll help the repair blend in and stay healthy by cleaning the exposed framing and surrounding surfaces with an appropriate antimicrobial solution.
Lightly scrub discoloration, then let the area dry completely. If staining remains, apply a stain-blocking primer to seal tannins, rust, and water marks before you repaint.
To reduce musty odors, improve air movement and remove any trapped debris that’s holding moisture.
- Clean visible residue
- Treat mold-prone surfaces
- Prime stubborn stains
- Deodorize the cavity
You’re restoring both appearance and indoor air quality, so your finished ceiling feels like part of a safe, cared-for home.
When to Call Water Damage Restoration Experts
When should you bring in water damage restoration experts? You should call them when ceiling drywall sags, stains spread, or water keeps returning after you’ve dried the area.
If you see bubbling paint, soft spots, active dripping, or any electrical fixture near the leak, don’t wait. Pros use moisture meters, thermal imaging, and controlled drying to find hidden saturation before structural damage worsens.
You’ll also want expert help if the ceiling smells musty, shows mold, or the leak source isn’t obvious. They can stabilize the area, remove compromised materials, and document the damage for your records.
Acting fast helps you protect your home, avoid deeper repair costs, and stay confident that your space is being handled the right way.
Prevent Future Bathroom Leak Damage
You can reduce future bathroom leak damage by tightening the weak points before they fail. Inspect supply lines, trap seals, and shutoff valves monthly, and replace brittle hoses or corroded fittings right away.
Keep grout, caulk, and tile joints sealed so water can’t migrate into framing or ceilings below. Test the toilet base, tub drain, and shower pan for movement, because even small shifts can open hidden paths for leaks.
- Install braided supply hoses
- Recaulk tubs and showers yearly
- Clear drains to prevent backflow
- Check ventilation to limit moisture
When you maintain these details, you protect your home and stay part of a prepared, resilient community that knows prevention is cheaper than restoration.
Frequently Asked Questions
How Long Does a Ceiling Take to Collapse After Water Damage?
It can collapse in hours or days, depending on saturation, ceiling material, and load. You should treat any sagging, staining, or cracking as urgent, because structural failure can happen suddenly and endanger everyone below.
Can Electrical Wiring Be Damaged by a Bathroom Leak?
Yes—electric wiring can get damaged by a bathroom leak, and that coincidence can be dangerous. You’ll need to isolate power, inspect insulation and junctions, and get a licensed electrician to verify safety and restore service.
Is Ceiling Water Damage Covered by Homeowners Insurance?
Yes, you’re usually covered if the damage came from a sudden, accidental leak, but not from neglected maintenance or long-term seepage. You should review your policy, document damage, and file promptly to protect coverage.
How Much Does Professional Ceiling Water Damage Repair Cost?
You’ll usually pay $300-$1,500 for professional ceiling water damage repair; one homeowner said the quote felt like “surgery for drywall.” You get belonging-sized relief when pros dry, replace, paint, and stop hidden mold fast.
Can I Stay Home During Bathroom Leak Restoration?
Yes, you can stay home if technicians isolate the work area, control dust, and restore utilities safely. You’ll need to leave if they remove contaminated materials, shut off water, or expose structural hazards.
Conclusion
You can limit ceiling water damage from an upstairs bathroom leak by acting fast, drying the area thoroughly, and repairing the source before moisture spreads. Watch for stains, sagging drywall, and musty odors, because hidden damage often moves like water through a sponge. If the ceiling is soft, mold appears, or the leak keeps returning, bring in restoration experts. Regular inspection and maintenance can help you prevent costly repeat damage.
Recent Posts
Flood Damage Repair Vs Water Damage Restoration Explained
If a burst pipe soaks your basement overnight, you may need water damage restoration; if
When To Hire Professional Flood Damage Repair Services
If you notice standing water, soaked materials, or a persistent musty smell, you may need
Flood Damage Repair Insurance Claims: How The Process Works
When floodwater hits your home, you need to move fast and document everything before cleanup